In this tutorial we’ll take a look at how you can export a Report into a PDF file. For information on adding a report and setting the feature user permissions please take a look at this tutorial.
Reports can only be accessed and exported on the browser version of Tapestry.
Reports can be exported either individually or in bulk. We’ll cover both methods, starting with how to export reports individually. For bulk exports, we’ll also take a look at how to access the file once the export has finished.
How to Export an Individual Report
All user types – staff, managers, relatives – can individually export reports that are visible to them, regardless of the bulk export user permission.
To export an individual report as a PDF, go to Planning & Monitoring > Reports.
Then, click the title of the report you want to download. From the List tab you can search or use the filters to find the report that you’re looking for.
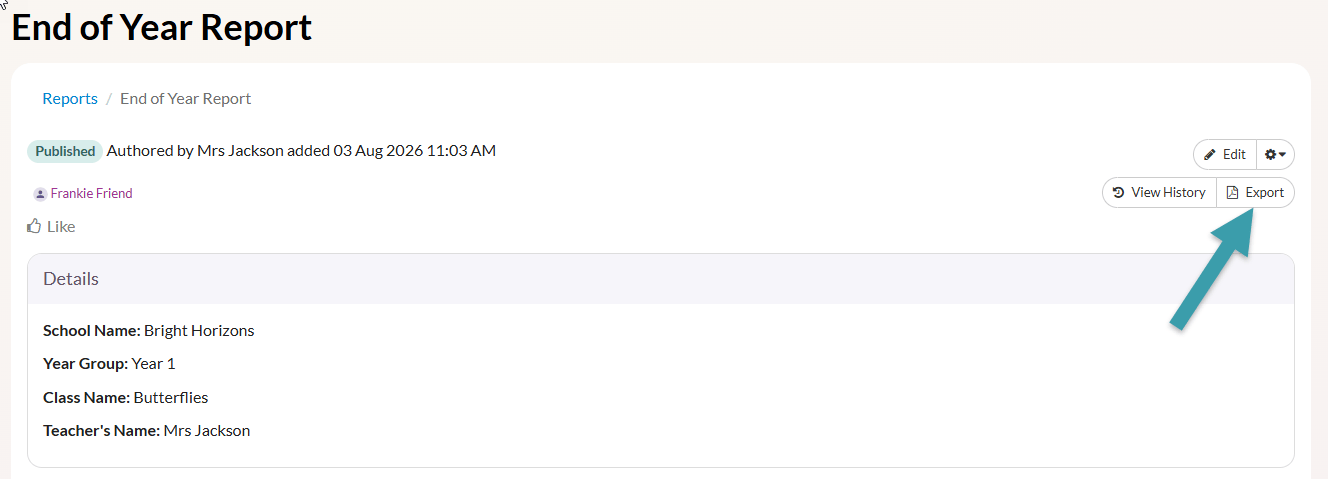
Near the top-right of the report, click Export. This will open a screen where you can choose your download options.
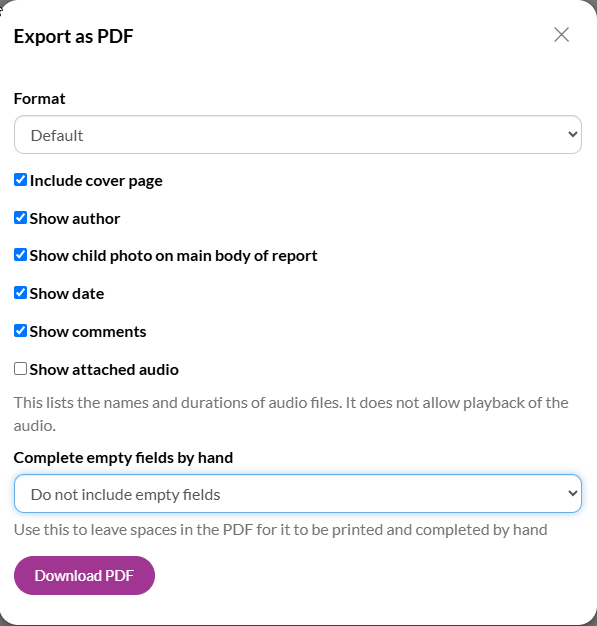
Here, you can choose the PDF format: Default, Compact (smaller text and spacing), or Printer Friendly.
Use the tick boxes below to select the information you want to include in the PDF. If you choose Show Attached Documents, the documents themselves won’t be included in the PDF, but their titles will be listed.
You can also choose to include empty fields for handwritten notes and select whether these fields are 5 cm or 10 cm tall. Only fields that are visible and contain no text will be included.
When you’re happy with your selections, click Download PDF to generate and save the report.
The PDF file will then download directly to your device.
How to Export Reports in Bulk
Only managers, and staff that have been permitted can bulk export Reports that are visible to them.
To export more than one report as a PDF, go to Planning & Monitoring > Reports.
Then click on the List tab.
From here, select the reports you want to export by ticking the checkbox next to each report, or use the option to Select all reports.
Once you have made your selection, a menu will appear at the bottom of the screen. Select Export as PDF, then click Go to begin the export.
You will then be taken to an export page similar to the one used for exporting individual reports. Here, you can choose the export format, select which information to include, and decide whether empty fields should be included so they can be completed by hand. In addition, there are a few extra options available for bulk exports.
You can specify a filename, which determines how the exported file will appear in your downloads and how it will be named if you save it to your computer.
You can also enter a title for the export. This title will appear at the top of each page in the PDF.
Finally, you can choose whether each report should begin on a separate page by selecting the corresponding checkbox.
Once you have configured the export settings, click Export selected reports as a PDF to generate the PDF.
The export will then begin. You can click on Your Downloads to access this. Or if you’re returning at a later time you can get to the export by following the steps in the next section.
Where to find your bulk exported Reports
Downloads are visible to the user who generated the export, plus all managers on the account. Managers can view downloads generated by other users.
To locate your bulk exported Reports head to Docs & Downloads > Downloads.
Here you will see your bulk report export under the file name you selected. Once the export is complete, you can select Download. The PDF file will then download directly to your device.
Please note, the report will remain available in your downloads for 7 days. After this time you will need generate the export again if you would like to download it.
And that’s it! You can now successfully export reports individually and in bulk.