In this tutorial, we’ll take a look at how you can add Bespoke Flags on Tapestry. Once you’ve added these Bespoke Flags, you will then be able to link them to observations and reflections.
You will need to be a manager on the browser version of Tapestry to access Bespoke Flags.
Adding a new flag set
To get started, you’ll need to navigate to Configuration > Flags.
After selecting Flags, you’ll reach the Flag Settings page. Next, click Add a new set of bespoke flags.
On the next page you will be able to add a title and a short description for your Flags, as well as choose the default colour. Below this you should see the ‘Flags’ section. You will be able to see any Flags you have added and you will have the option to add a flag or to add multiple flags.
Selecting Add a flag or Add multiple flags will open a pop-up box. Within this box, you can name your Flags and choose the colour you would like to use. If you do not select a colour here, the Flags will show as the default colour for your Flag Set that you selected earlier. Once you are done, click Save flags.
You should then see your Flags appear in the Flags section. If you select the cog icon next to one of the Flags, you will be presented with a number of options. You can edit the Flag, add one or multiple Flags within this Flag, move, or delete the Flag.
Clicking and holding the omnidirectional arrows (to the left of the flag name) will allow you to drag and re-order the Flags.
You can add multiple Flags within a single Flag, and you can also add Flags within Flags within Flags, so each layer will appear indented when it is added to an observation or reflection, as shown in the image below. In the example shown below, I added three Flags (titled Subcategory 1, 2, and 3) within ‘Flag A’.
Once you’re happy with your Flags, select Save changes at the bottom of the page. You will then see a prompt to Enable now. If you choose to enable the Flags now you will be given the option to enable them for observations and/or reflections.
If you enable the Flags for observations you will also be able to decide whether you would like the Flags to be visible to relatives. Tick any boxes that apply and then press ‘Submit’.
If you don’t want your Flags to be enabled right now don’t worry, this can be done at any time.
Once you have enabled your Flag Set you should see it appear under the ‘Flags’ section whenever you add or edit an observation or reflection (depending on whether you enabled the Flag Set for observations and/or reflections).
Editing Bespoke Flags
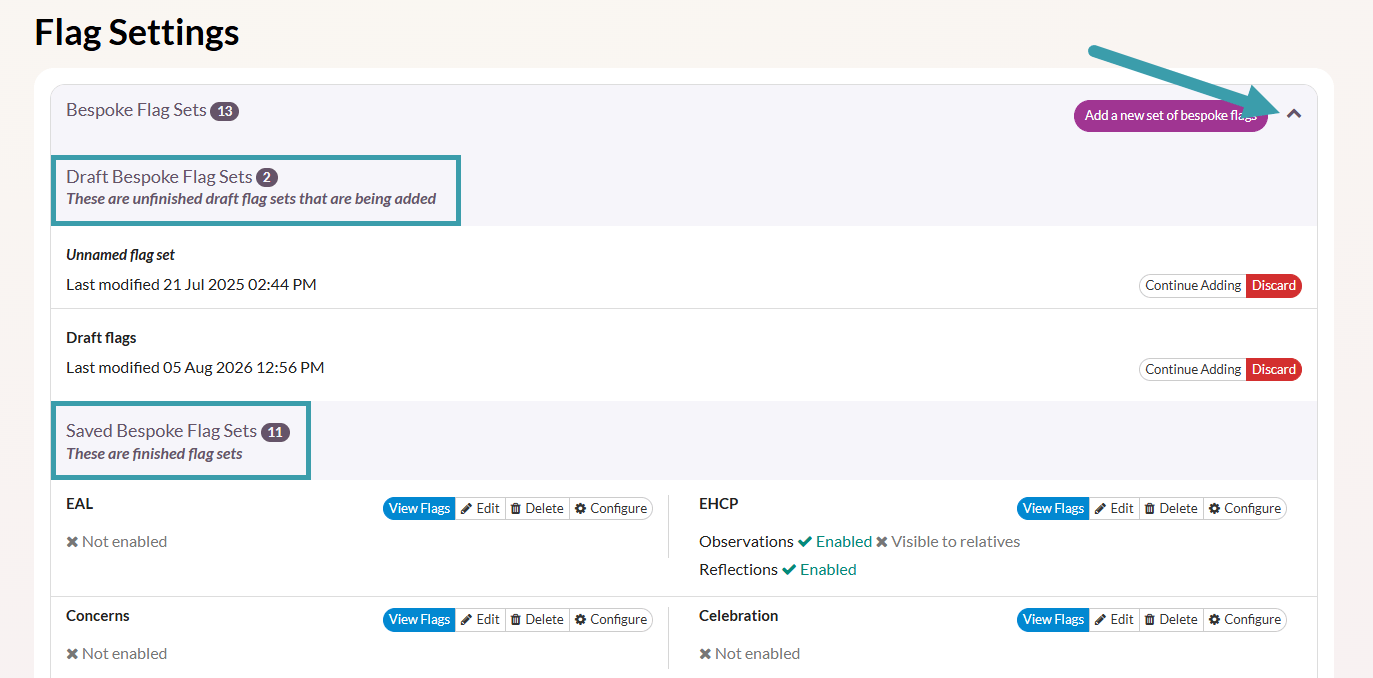
If you would like to make any changes to your Flags, delete a Flag Set, or enable/disable the Flags, you can do this by going back to the Flag Settings page (via Configuration > Flags). Once you are here, you can select the Bespoke Flag Sets drop-down menu, which will show your draft and saved Bespoke Flag Sets.
Next to your saved Flag Set you will see buttons to edit, delete and configure the Flag Set.
Please note that deleting a Flag Set will delete it permanently, and will remove it from any observations and reflections it had previously been added to. If you believe you may need to use the Flag Set again in future we would recommend disabling it instead, that way it can always be enabled again later.
That concludes this tutorial! You now know how to add and edit a Bespoke Flag Set on Tapestry! For information on draft Bespoke Flags please take a look at this tutorial.
If you have any further questions, please feel free to contact us at customer.service@eyfs.info