In this tutorial we’ll go through all of the available Exports within the Management System. The Management System will need to be set up before you can access these, so if you haven’t done so already please refer to this tutorial on how to set it up.
Only manager staff users have access to the full Management System, so you’ll need to be a manager to make use of these exports.
To access the exports, go to Management System > Exports.
The following tabs in this tutorial will take a look at these exports individually:
- Booking CSV export
- Child Absence CSV export
- PDF and CSV Invoice exports
- PDF and CSV Child Register exports
- Staff Register CSV export
- Funding Loop export
You can export booking data a CSV file.
First you’ll need to select the date range. It will default to exporting data for one day on the current day. You can amend this by clicking into the Start Date and End Date fields, or use one of the Common Ranges just below.
You can then select the child you’d like to export the data for, choosing between exporting for All Children or for an individual child in the list.
You can then choose whether to include bookings within your date range that contain Closures and / or Absences. Absences will be selected by default. If you want to select or unselect either option just click in the relevant box.
Finally, if preferred, you can Include Individual Bookings for extra details (as described below). Once you’re happy with your options, click on Generate CSV. The file will then download directly to your browser or device.
All files will contain the following summary booking data: your export parameters at the top, then the child name, age at the start date, room, session, number of sessions, number of hours booked, and a breakdown of how many of these were funded and unfunded.
If you chose to Include Individual Bookings then you will also have an additional section for individual bookings underneath the summary booking data. This will contain: child name, age, room, session, booking type, date, start and end time, number of hours, including a breakdown of how many of these were funded and unfunded, and the funding type.
You can export children’s absences into a CSV file.
You can choose the date range of the data you’d like to export. It will default to the current month but you can amend this by clicking into the month, or select a custom date range by clicking Use Custom Date Range.
You can also choose to export the CSV containing absences for either All Children, Children in a specific Room, or for a Single Child. For the last two, an additional drop-down box will appear to make the room or child selection.
Once you’ve happy with the options, click on Generate CSV and the export will be downloaded straight to your device or browser.
The file will contain the following data: the child’s name, the start and end time and date, the type of absence, and any notes left on the absence entry.
There are two types of exports for the invoices that you create within Tapestry’s Management System: you can export a copy of the actual PDF invoices (for individual children and for groups of children); and you can also export details of your invoices into a CSV file that you could use for uploading into an external accounting software (Xero or Quickbooks). We’ll take a look at both exports below.
The CSV export allows you to export Tapestry invoice data for the purpose of importing into Xero and Quickbooks. Please take a look at this tutorial to set up the export data for your accounting software.
Invoice PDF Export
An alternative way to get to this export screen (that isn’t going through Management System > Exports – as shown on the Intro tab) is through Configuration > Children > Manage Children. From here, you can either click the cog next to an individual child and select Bulk export Invoices as PDF, or tick the boxes for the relevant children and select Bulk export invoice PDFs in the bottom right before clicking Go.
The next steps are the same regardless of how you get to the Invoice Export Form screen.
Click on the Select Children button to choose the children that you’d like to export the PDF invoices for.
Tick the box to the right for the required child[ren]. You can use the search bar or groups tab at the top to find certain children, and use the select all button to tick the box for all children within that list.
Once you’ve made your selection click on Done, and then Export.
The invoices will then be queued for export, which you can access by clicking on View your Downloads.
When the export is ready you can Download the zip file (that contains the PDF invoices) to your device.
Invoice CSV Export
Firstly, you can choose the date range. You can either export invoices that have an Invoice Date within the chosen range, or invoices that have been created for the date range Period.
The range will default to the current month, but you can amend this by clicking into the month, or by choosing to Use Custom Date Range.
You’ll then have some options to do with the children included and the format of the CSV. You can choose between generating a CSV for All Children, Children in a specific Room, or for a Single Child. For the last two, an additional drop-down box will appear to make the room or child selection.
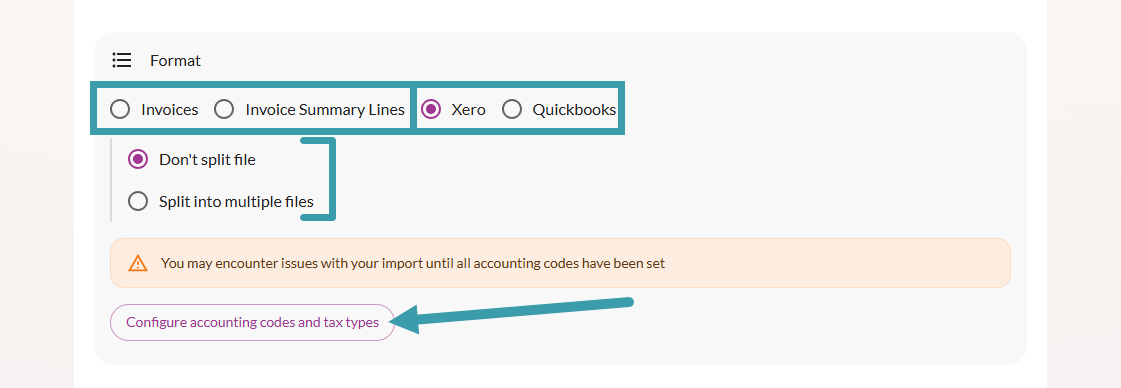
Next, for the format you can select either:
- Invoices
- Invoice Summary Lines
- Xero
- Quickbooks
Invoices will produce a CSV that has information from each invoice as a single line, whereas the Invoice Summary Lines option will give you more detail by having each charge within an invoice on a separate line. E.g., if an invoice has charges for Regular Schedule Bookings, Extra Charges, Extra Bookings, Refunds, or Fixed or Annualised Monthly Fee these will also display on separate lines.
If you’d like to generate an export compatible with your accounting software then you can choose between a Xero or Quickbooks format. Either of these selections will give a further option between splitting the invoices into different CSV files or not. If you choose to Split into multiple files then you’ll need to enter the amount of files you want it split the invoices into. You’ll also want to configure your accounting code and tax type first, as shown in this tutorial.
Once you’re happy with the options, click on Generate CSV. The file will then download directly to your browser or device.
The Invoices format will contain the following information:
And the Invoice Summary Lines format will provide further detail:
The Xero export will look something like this (when only one invoice falls within the date range):
Whereas the Quickbooks export like the below (when only one invoice falls within the date range). Please note that any negative invoices will be included within a separate CSV file for Quickbooks compatability.
You can export data from the Online Child Register into both a PDF and a CSV file, depending on how you would like to view the data. We’ll go through both options below.
Child Register PDF Export
On the export page, you can customise what is included in the export and how it is laid out.
In the Export Options section you will need to select your register date range, and then whether you would like to create a separate register for each room, or combine all children into one register.
If you want to edit the way that the PDF export is laid out, click on Layout Options to open up the options as to how it will be formatted.
- Expected Times – you can choose between showing either their overall arrival and departure time, or their individual booking times. The former will display only the earliest arrival time and the latest departure time for each child. Alternatively, individual booking times will instead show individual session times each child is booked into.
- Optional Fields – you can choose to display all of none of the optional fields. You can show the child’s DOB and age, and have 3 extra rows to add anything additional to your register by hand. You can also include booking notes, which will show notes you recorded when creating extra bookings or absences.
- Extra Field – choose whether you include Notes or Dropped Off/Collected fields on the export. Or you can choose neither.
- Sort Children – decide what order children are shown in on the export.
- Font Size – if you want to fit more on the page you can choose a smaller font size, or choose larger if you prefer.
- Page Breaks – you can choose to remove all page breaks from the export, giving you a continuous document.
When you are ready to generate the export, select Generate PDF and the PDF export will be downloaded straight to your device or browser.
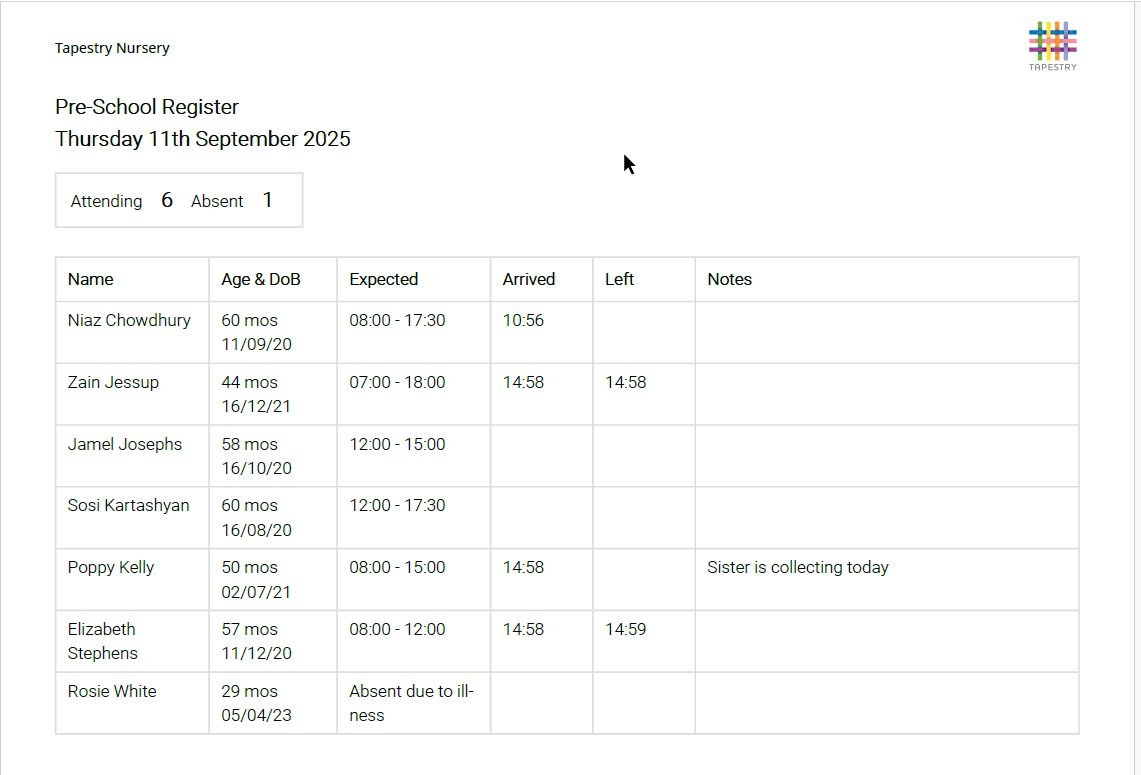
Depending on your layout and export options, your PDF export will look something like this:
Child Register CSV Export
Start by selecting the start and end dates that you’d like to get the data for (it will default to a one month period for the current month). You can also choose whether you want the export to be for the whole setting, or a specific room. Once you’ve made your selections, click on Generate CSV. The file will then download directly to your browser or device.
The file will contain the following data: the register date, room, child name, expected time, absences, actual arrival and departure time, hours of attendance during that day, and any register notes.
You can export data from the Online Staff Register into a CSV file.
Simply select the start and end dates that you’d like to get the data for (it will default to a one month period for the current month) and then click on Generate CSV. The file will then download directly to your browser or device.
The file will contain the following data: the register date, staff name, arrival and departure time, hours of attendance during that day, and any register notes.
The Funding Loop export allows you to export invoice data from Tapestry in a format that can be uploaded straight to Funding Loop.
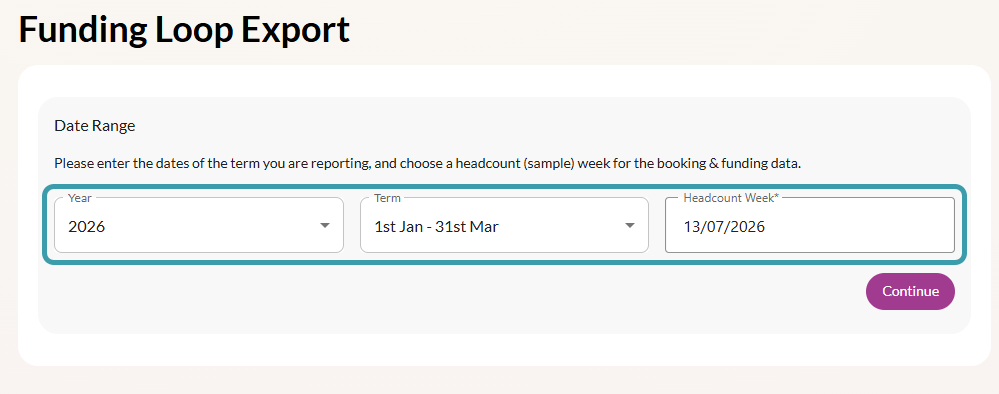
Begin by selecting a Year and a Term by clicking into the relevant field. Absences and closures will be ignored, but not school holidays.
You then need to select a Headcount Week in the same manner. The week must fall entirely within the dates selected, with the week starting on a Monday. The headcount week is used to populate the booking and charges data section of the export. All children who have any funded hours booked at any point within the selected start and end date (inclusive) will be included in the export.
Then click on Continue.
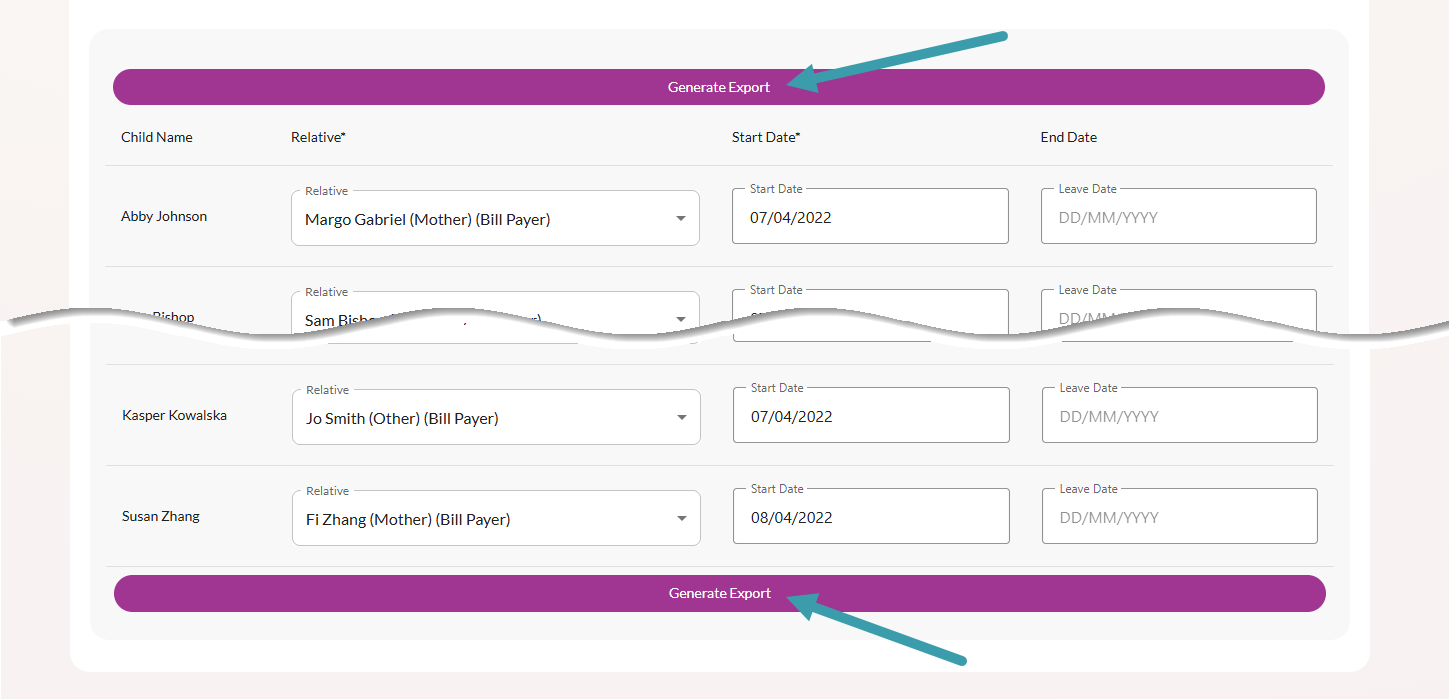
You’ll then see a preview of the report based on the selected dates and headcount week. This will include: the children to be included in the export, their funding loop contact, the child’s start date, and their leave date.
The leave date is not mandatory, but you can add it in, if relevant, by clicking into the box. Having a funding loop contact and a start date is required before you can generate the export.
The child’s funding loop contact can be added by clicking into the Relative box. Here you will see all of the child’s linked relatives on Tapestry, along with their relationship including whether they are a bill payer. Make the relevant selection.
You can also select and amend a child’s Funding Loop contact by going to Management System > Children > selecting the child > Finance. On the right hand side underneath ‘Billing Address’ you will find Funding Loop Contact to view and amend.
Once all of the children have a contact and you are happy with the data click on Generate Export, and the export file will download directly to your device.
And that’s all of the Management System Exports. You can use the buttons below to explore the Management System set-up, and available Reports.